
AccuAccount Overview Presentation
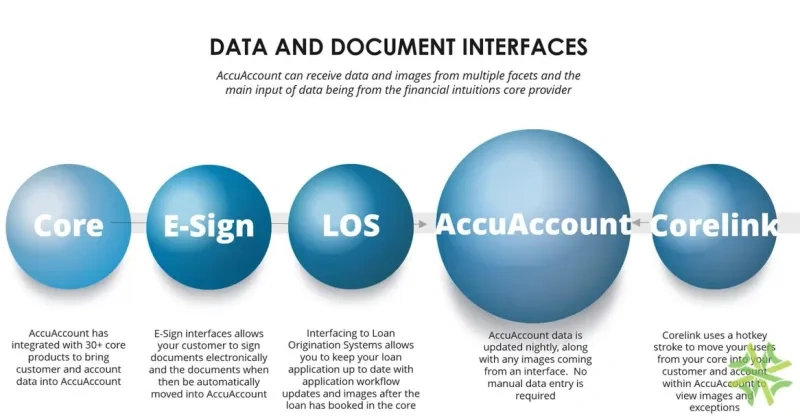
Good afternoon, and thank you for joining us for our AccuSystems presentation. I'm Jamie Biggs. I'm a product sales specialist with AccuSystems. I've been with the company for about thirteen years, and I'm currently working with our sales team. But I have spent most of my career with AccuSystems doing training and support. AccuSystems is based in Pueblo, Colorado, and we've been building and supporting AccuAccount for banks and financial institutions since two thousand and three. AccuAccount was built for loans, deposits, trust imaging, and exception tracking. So all of the features in our software have been developed with the feedback and request that we receive from banks and financial institutions to ensure that our product meets your needs. Our imaging and exception tracking is all AccuSystems focuses on, which makes us different from other imaging systems that might be a part of your core. So we spend all of our time and resources ensuring that AccuAccount meets the needs of our customers. We aren't splitting our focus on multiple programs. So for today's webinar, we're going to go mainly through a high level overview of imaging and exception tracking. We'll also talk about the implementation of your system and go through a demo of the software so you can get a feel of the layout and functionality. I will briefly touch on some of the other features AccuAccount has to offer as well. So if there's a feature that you'd like to see more in-depth, just let us know, we'd be happy to send out a recording of how it works, or we can schedule a one on one meeting with you to show you the feature and answer any questions that you may have. So before we take a look at the imaging and exception tracking, let's talk about how we get the data into AccuAccount. First of all, we integrate with your institution's core system. We've worked with over thirty core products to bring in customer and account data into AccuAccount. So your core will push out a daily data file that will run through a nightly process to update the data within AccuAccount nightly. Any new customers, accounts, loans, and collaterals will all be imported into AccuAccount, and any existing records that are already in AccuAccount will be updated as well. So if something like a loan balance or a status changes on your core system, you'll see that update in AccuAccount after the nightly process runs. So we do this to stay in sync with your core. When your data is imported, it gets mapped into AccuAccount. All of your mappings are going be set up during your implementation process, so your customers and accounts, loans, collaterals, and any other key pieces of data will show as the correct type in our system. Along the way during the nightly process, we will also pick up any eSign documents to be imported directly into AccuAccount. You'll send out those documents to be electronically signed, the customer signs them and returns the documents, and then we will import those documents directly to the customer's page into the appropriate document tab it needs to be saved to, so you never really have to touch those documents. We can also integrate with your loan origination system, such as MortgageBah, Encompass, Sageworks, Encino, or any other products that you currently use. We take the images that are pushed out of the loan origination system and import those directly to the customer's page with the AccuAccount nightly process. We can also bring in data from your LOS. So if there's information you're gathering that you'd like to keep with the loan, we can import that data with the nightly process as well. We have our own interface called CoreLink that gets installed as well. CoreLink allows you to go from your core or any other program that you're working in directly to a customer loan or account within AccuAccount. So, for example, if you're working in your core system and you want to check the financial documents in AccuAccount for the customer you're working with, you'll hit a hotkey, control alt a, and it will do a screen scrape of your core screen and open AccuAccount right to the customer or account you're working on so you can view those documents or any exceptions that the customer might have. You can also do this from the web if you're doing a credit check, or another example would be working from a spreadsheet or Word document that you need to see a customer's images on. You can use CoreLink out of any application to go directly to a customer's page in AccuAccount very quickly. Here's just a small list of some of the interfaces we have done. This allows your bank to be more efficient with imaging, saves you time and effort getting those documents, and pushes them directly into AccuAccount, so you never really have to touch those documents. All that work is being done for you. We also offer conversions available for any existing images or exceptions that you'd like to have in your AccuAccount system. We've worked with many other programs. Here's just a few examples of the ones that we have worked with. Converting those existing images and or exceptions allows you to hit the ground running as soon as you implement AccuAccount because you won't have to be repeating any of the work that you've already done. During the implementation process, you'll decide what images and exception information you want to have brought over and where you want it to be saved in your AccuAccount system. Now I wanna take you through a short demo of working in AccuAccount so you'll have an understanding of the layout and navigation within the system. Then we'll go into more detail on the ways that you can image into the software and some of the exception tracking features. Okay. So when we open up AccuAccount, you will initially be taken to a dashboard page. This dashboard can be customized for each user that logs into the system. So depending on your user's role at your institution, you may have different reports or different widgets that you would like to see on your dashboard. Here we have a home dashboard that has been set up. I have a quick search to start going and looking at my customer pages. I have active tasks that have been assigned to me. We also have a news feed coming in from AccuSystems that you can turn on. You can look at uploaded files if you're working on the imaging side. I also have a loan application by lenders. This is a custom report that has been built in the system that I have turned on to be displayed on this dashboard and so on. So there's several different types of panels that you can turn on here. We have exception summaries, have opportunities that you can turn on, and you can also have as many dashboards as you would like. So if I choose this drop down here, I may look at a tracking dashboard. I have my approved applications to be booked if you're using our loan approval system. We have active tasks that have been assigned to me, and then I have the exception report by officer that I have turned on for this dashboard. These are all hyperlinks to get directly to a customer page. So if you want to quickly jump to somebody that you're working on from your exception report or from different tasks that are assigned to you, you'd be able to do that as well. So, again, you can go in, and you can create as many of these dashboards as you want to see so you can get data right away for what you're looking for from your system. We'll go ahead and use this quick search panel to go to a specific customer's page. Any of these fields as you type is going to populate with any customers or any account number or tax ID number that matches in your database as you type. So here we have a customer page for Amalgamated Industries. We have built the customer page to mirror your institution's credit and loan or account files. So up at the top, we're going to have all of the customer's information, and this is importing from your core system on a nightly basis. So if something gets updated in your core, it's going to reflect an Accu account the next day. We also have a section where flex field information can be brought in at the customer level. So if there are specific fields that you want to have imported from your core system that are not standard fields within AccuAccount, we can build those as flex fields so that you can have that data available. You can also pull reports on this flex field information. The left side of the customer page is going to be dedicated to all of your credit or customer information that you're collecting. For the document tab that we have available here, you will see a document structure that is specific to a customer type of, in this case, a corporation. So we will map in all of your customer types to be displayed here, and each of those customer types will have its own specific document structure that you will define during the implementation process. The document structure is set up to have a group of documents and then your specific documents that you're imaging or viewing within those. You'll notice throughout our entire system that we use red and green indicators if information is available or if it's missing. So if you see a green dot next to a document, that means that there is an image, and there will be a view icon to view the image next to it as well. If there is not something imaged, you're going to see a red icon, and you'll see that throughout our entire system. If there is not data, you're going to see that red dot indication. These credit documents are shared regardless of what loan or account you're viewing for this customer. When these document structures are defined, you'll be able to say which of these credit documents are loan credit documents and which are deposit documents if you are bringing deposits into the system. So if somebody logs in that is a lender and only has access to view loans within the system, they wouldn't be able to view a credit document such as a driver's license if you have that as part of your document structure. And on the other side of that, if somebody logs in that only has access to view deposit accounts, they may not be able to see financials from the credit side. The right side of the customer page is all for your loans and accounts. You'll be viewing one loan or account at a time. In this case, we're viewing loan ending in four one two. So all of the information we see in these banners are data that has been imported from your core system that pertain to this loan. We also have a section for flex fields that can be imported at the loan level. So again, if there's specific information that you want to bring in from your core system, we can set up those flex fields to display that information, and you can also pull reports. The loan that we're currently viewing is set up as a commercial revolving line of credit, so the document structure that we see down below is specific to that loan type. So again, as part of that implementation process, we will be setting up your loan and account types. You'll define what document structures you want to have for those specific types, and those will be mapped in with our nightly process. If you're wanting to change the loan that you're viewing, there is an option up here. We can see that Amalgamated Industries has eight loans. This will display any loans that they are primary or secondary on. So we can see some information about the other loans and applications if you're using our Accu approval system, and you can easily change between the loans that you're viewing. So if I wanna choose a different loan, we just click on that link. Page is going to change the loan that you're currently viewing along with all of the data for the loan, and it will have its own document structure to be able to scan into and view images on. Now regardless of what loan you're viewing, we still have the same document structure showing over on the left side or the credit section of the customer page, so those documents only have to be imaged one time. So it's really easy to change between the loans that you're viewing and view the specific documents for that loan. Same thing if we're bringing in deposit or trust accounts into your system. You can click on a deposits tab if you're bringing those in. We can view deposit information for this customer. We're gonna bring in this data from your core system. We'll map all this data in the same way we would do with a loan account, and we have the option of bringing in flex filled information on deposit accounts. Each deposit account would also have a mapped in account type with a corresponding document structure that you would define. All of these features work the same way if we're bringing in trust accounts. I'm gonna go ahead and go back to loans. We'll mainly focus on loans today, but just know that all of the features that we are looking at are also available for deposit accounts. For loans, there is an additional section down below where we will import your collateral information. In this scenario, we can see that there are five pieces of collateral tied to our parent loan up above. We will import the data for the specific collateral. The collateral type will be mapped in based on your codes and the collateral types that you want to have imported, and then you will have a corresponding document structure for each type of collateral in your system. What's nice about this is all of the documents that you're viewing in here, you will know are specific to this address, and this description is also something we import from your core system. If your institution uses cross collaterals, we do have a way to handle that as well. We can change which collateral we're viewing, select a different collateral number, and the page will refresh with that piece of collateral's information. So the credit section didn't change. The loan section above doesn't change. It's only changing the piece of collateral that you're viewing, and you can view this collateral specific documents that are scanned in. Now collateral number three is a little different because it is a cross collateral in our system. So if you utilize cross collaterals, you can go in and tie collaterals together so that their documents and exception information are shared. So this means that documents only have to be imaged one time, and that information will show regardless of which loan that you're viewing. If you make a change to the documents, if you make updates to the exception information, those changes are going to be reflected under each of those loans. So a little bit more about the document features that you have available. So it's very easy to view images in the system. If there's something that you're wanting to view, you're just going to click on the view icon, and it will open up that document in whatever viewer you have installed. When you have an image open, we do not lock or restrict the image in any way, so you can have more than one person viewing the same image at the same time. So if you're on a Zoom meeting, and you want to discuss a specific loan, everybody can be on the same loan in AccuAccount viewing all the same images. You can also have more than one image open at the same time. So if I click on another image, that opens up in another viewer. So if there are documents that you need to compare, you can open as many images at the same time as you would like. You can also have multiple documents for each of your document tabs. So here's an example of that under Guarantees. We have a guarantee for John Smith. We also have a guarantee for Laura Wilder. You have the option to either image these documents together and flip through the pages, or you can have them separated. If you separate them out, you can add a title in there. You can also give your title a color. So if you want it to really stand out, you might put somebody's name or whatever you title the document as in red or something bold, and it will have that title showing in whatever color you select. You can also see I have put a title in the promissory note. So if there's something specific that you want to know about that document and you want it to stand out, you'll just add that to the document's title. Comments can be added to any of your documents. You can hover over those comment bubbles, or you can click on those to open it up in a little pop up box. We track expiration dates on any documents that expire. So if it's a future date, you're going to see that expiration date show in gray. If that expiration date has passed, this will change to a red color, it will really stand out on the customer page that something is expired. That's also going to trigger an exception on your reports, but we'll dig into that a little bit more in just a bit. There's a feature that can be enabled on any of your document tabs for documents that reoccur, such as financial statements, tax returns, rent rolls, anything that you're going to need to get on a regular basis. You can turn on a schedule to tell the system when you need that document. So in this scenario for the financial statements, we can see that we have collected financial statements quarterly for this customer. So every quarter as part of the nightly process, it's going to turn on the next document tab that needs to be collected. So in this case, we have the missing April twenty twenty two financial statement that has a red indicator so we know that that document is missing. That will turn on an exception on your report so you'll know that you need to collect that document. But once you receive the financial statement for April, we can go ahead and image that document. So when the next quarter comes around, it's going to turn on the next document tab showing with a red indicator so we know what's missing, and it will show up on a report so we know to reach out to the customer to collect that information. As part of the implementation process, you will also determine which of these documents are always required and which ones are only needed on a case by case basis. So if you are working on a loan, you may have a group of documents called construction documents that would not be showing by default. When your users are working in the system to add your document images, they can easily enable an entire group of documents, so they would turn on the construction group, and you would have a whole list of documents that can then be imaged. But since construction documents wouldn't always be required for every loan, they're hidden in the background so that they don't track exceptions on your reports, but you just turn them on when they're needed. Now, I wanna touch on the exception tab that you'll see available on the credit section of the customer page. You'll see that for each of your loans or accounts, and there's also an exception tab down on each piece of collateral. When you click into these exception tabs, you'll be able to see anything that is tracking for your customer or for your loan and accounts. If there are active exceptions tracking, we're going to see the green indicator in the exception tab. You'll see a section for task exceptions that need to be completed for this customer's loan file and also a section for document exception, which are going to be any of your missing or expired documents. We're gonna get into more detail about how the exceptions track in the system in just a bit, but I just wanna show you how those exceptions look on your customer's page. The next tab is going to be for guarantors. So we will import relationship information for your loans and also for your deposit accounts. You'll see a tab called signers on your deposit accounts. This data also gets imported with our nightly processes. You can see who your guarantors are, the type of relationship that they have to the loaner account, and their customer number. These are links directly to the customer page. So if you wanted to view John Smith's information, we can click on John Smith's name, and that quickly takes us over to the customer page for John Smith. Now he is an individual customer type in this system, so the documents on the credit side are going to be specific for an individual customer type. So each of your guarantors are going to have their own customer page, even if they don't have primary accounts. We will track their credit information independently on their own customer page. Now, even though we're on John Smith's customer page, we see his financials, we are still viewing the same loan that we were on. So Amalgamated Industries is the primary, and John Smith is a guarantor. But we can still view all of the loan's information, and you can see all of documents. So those images are only input into the system one time, and you can view those loan documents regardless of which borrower's page you're currently on. From here, you can also view any other loans that John may be associated with. You can view deposit accounts that he might be on as well. I do wanna show you one additional feature that we have on the deposit side, and that is this link for switch to teller view. This is a great feature that allows you to compare two documents from your customer's file. So this teller view is going to bring up the driver's license for the customer that you're working on and the signature card for the deposit account that you're looking at so that you can easily compare information. This teller view can be set up as a default view for your users. If you have somebody that's at the teller line and they're working with a customer and they need to verify a signature or they need to just see the driver's license to verify a customer's identity, they can use CoreLink quickly open up AccuAccount right to the customer's page in this view. So if they're working in the core system with a customer, they hit control alt a on their keyboard to do a screen scrape of information. It's then going to launch AccuAccount with this being their default view so they can quickly see the customer's driver's license and signature card. Now let's go ahead and go back to the main view of the customer page, and I'm gonna go ahead and go back to Amalgamated Industries. There is a quick search option at the bottom of each customer page, so it's easy to go between customers this way as well. The next tab that's available on the credit side is going to be for entities. These are related entities that are optional to have in your system. You can manually build related entities, or we can import that data if you have it stored somewhere. This allows you to manage entities that are tied together. So this doesn't mean that there are signers or relationships on each other's accounts. It truly means that the customer is associated with one another. So this might be sister companies, DBAs, those types of relationships. It allows you to build a group, and then you can associate whatever customers you want to have within the group. It'll show the outstanding balance and commitment amount for their loans and a running total at the bottom. We do have reports that are available for related entities, so you can get this information in a report form as well. So there's a couple other features I wanna point out on the customer page. The first being our document thumbnail view. This is just another way that you can view the information from the customer's page. It's a more simplistic view that allows you to see thumbnails of the images that are stored on the customer's page. This will default to the customer's credit documents. You can view the documents by clicking on the thumbnail, and it opens up in a separate viewer. This view will also show you how many pages each of these documents has, and you can click on this view change history to see the history of everything that has happened with this document. So we can see back in two thousand nineteen, the document was initially uploaded. We can also track each time a document gets viewed in your system. For each change that's logged on your documents, you can do an approval. So you can go in and you can approve or reject documents. We save that to the document's history. This can also generate a notification to the user that made the change on the document. This view also has a quick search, so you can start typing in a title of a document, and it will narrow down only the images that you're wanting to view. You can also switch over to viewing a loan, deposit, trust, or collateral documents. I'm gonna go ahead and switch back to our list view, which is our standard view of the customer page. There's one last feature I wanted to show on the customer's page, and that is our customer summary. The customer summary gives you a view of all of the customer's information. We have the customer's credit information, any exceptions that are tracking, their related entities that they're associated with. Any comments that you've added to the customer page will be carried over. Then each account and loan will have its information as well. So we have the deposit accounts, deposit exceptions, the relationships. If we move down to the loans, we can see the loan information, loan exceptions, borrowers, collateral information. So truly, any information that's being added onto the customer's page is going to show up in this customer summary, and this is printable. So this can be used as a credit presentation. Next, let's talk about how we get your images into AccuAccount. After implementation, you'll already have any electronic files that were in your previous imaging system available in AccuAccount. We can also bring in image data, such as comments and expiration dates from your core over with that conversion. On a nightly basis, we'll import images from your eSign and LOS products. Then there are several ways to get electronic files that are either saved on your network or are coming in from your loan officers via email, and paper files that you have stored needing to be imaged, or ongoing trailing files that are coming in. For scanning in paper files, the first option you have would be scanning with barcodes. Barcodes are typically used for bulk or backlog scanning. A customer loan, collateral, or deposit account cover sheet is printed and placed on its corresponding documents. Each document will have its own barcode page as well. So these documents can be stacked in any order, even combining multiple customers and accounts, as long as they have the appropriate barcode. The stack of documents is then put into your multifunction device or a desktop scanner. We'll read those barcodes, and we place those documents in their correct location for each customer within a minute on your customer pages. You can also use third party barcodes. So if you have a document prep system that prints barcodes on your loan or account documents, we'll map your current barcodes into AccuAccount. So document barcodes don't have to be printed from AccuAccount in this case, or you can use a combination of AccuAccount barcodes and third party barcodes when they are available. The next form of scanning is direct scan. This allows you to scan directly into AccuAccount from a desktop scanner, or you can edit existing documents within AccuAccount. You navigate to a customer alone in AccuAccount, and then launch our scanning software to quickly scan in whatever document you have in hand and save that document. You can add all the document details, such as an expiration date, comments, or a title at this time. Then you can always reopen those documents within our scanning software to make edits, and you can add and remove pages at any time. Scanning can also be done by launching our scanning software from your desktop. Once the document is scanned in, you can then input the customer, loan, or account information. You can use barcodes if you'd like to define that information as well. But with this method, you don't have to be an AccuAccount whatsoever. You can do all of your scanning and editing from our scanning software. And once you click save, it'll push all that information into AccuAccount automatically. Batch scanning is our newest feature that has been added to our scanning software. Batch scanning allows you to scan a stack of documents belonging to multiple customers or loans and accounts, and then you can divide up that document quickly and easily. Once your stack of documents are scanned in, documents can be grouped together as needed, optionally titled, and then you can just drag and drop those documents to the location where you want them to be saved on your customer page. Bouche scanning can also be used with your multifunction scanner, you don't have to use a desktop scanner. A group of documents can be scanned in and saved to your network. Then you would just drag and drop those documents into the scanning software to begin breaking apart your document. You then just drag and drop those images to the location on your customer page, and it automatically saves them. This method can also be used for electronic documents that you may already have saved, or if a customer emails you financials and their tax returns all in one combined file, you can use our software to easily break those documents apart and save the images in their corresponding document tabs within AccuAccount. Now, let's take a look at your options for getting electronic files into AccuAccount. A traditional upload can be done per document tab on a customer's page. You can add your document details during this process, browse out to wherever your document is saved, and quickly upload it to that document tab on your customer. We also offer a drag and drop upload that allows you to quickly move an electronic document from a saved location to a document tab. This makes getting images that are emailed to your lenders easily available after a quick drag and drop. Here are some of the benefits and features that our imaging products offer for electronic document images. You can keep the same format of a document you're uploading, or you have the option to convert it to a TIFF or PDF. Any file type can be uploaded. A PDF, Word, Excel, JPEG, Truly any type of document that you have, you can upload into our system. You can remove passwords on password protected documents during the upload process. You can upload only certain pages of a document instead of a whole file. You can choose to allow your users to push a document into its final location on a customer's page, or you can have it sit in a holding location for another user to verify first, and then they would move it to your customer's page. Finally, you can use your bank's current customer portal, such as Citrix ShareFile or any other portal that you're using, in combination with our notice letter feature to request documents from your customers and then upload those right into AccuAccount to your customer's page. Next, let's talk about the exception options that are available within AccuAccount. During implementation, you'll build all of your customer types, loan and account types, collateral types, along with a document structure for each. You'll then determine which documents you'd like to track exceptions on. So you'll have the ability to track document exceptions when an image is missing or if a document is expired. You'll have task exceptions available, which is more of a free formed way that you can track something that needs to be completed for a file, task lists, which are a group of tasks that need to be completed, and policy exceptions. All exception options are available at the credit level, account and loan, and the collateral level on your customer pages. I'm gonna go ahead and reopen AccuAccount to our customer page so we can talk a little bit more about those exceptions, how they look, and how they track. So I'm gonna go back into the exception tab on the credit side of the customer page for Amalgamated Industries. We do have a task exception set up. So this is a task that needs to be completed for this customer's file, and we have our document exceptions. So in here, you can see we have an expired certificate of good standing. This is actually a pending exception, and we know that because it has a yellow exclamation point. A pending exception is used for a document that expires that is within a grace period. So within your setup of your exceptions, you will also determine when you want to have a grace period. This can be a lead time so that you can start tracking an expired exception before the expiration date, or you can give it a true grace period and give yourself more time after the expiration date of a document. But when it's in that grace period, you're going to see that track as a pending exception. We also have a couple missing documents that are tracking for this customer's credit file. If I were to go back to the document tab and uploaded the image for the rent rolls, that would automatically clear the missing rent rolls exception from my exception list. So you really never have to touch your document exceptions. If something is missing, it will automatically track a missing exception. Once that document is imaged in your system, it will clear that missing exception. Same with the expiration dates. When you have something that expires in the system, it will automatically turn on an expired exception. And once you receive a new document and you push that expiration out to the next expiring date, it will clear the exception until the document expires again. If we look at the exception tab for the loan that we're currently viewing, we can also see that there are task exceptions that need to be completed for this file, and then the document exceptions that are tracking for anything that's missing or expired. This works the same way down in the collateral section when you're viewing these exceptions. Another feature that we offer would be task lists. This would be a group of tasks that you need to turn on for a file. You can do this at the credit level, the loan or account, or down in the collateral section. These are predefined tasks that need to be completed. So, for example, if I wanted to turn on a task list for this piece of collateral, I can choose which task group to execute, and it will turn on any tasks that need to be completed, in this case for a foreclosure. When using these task lists, you can have all the tasks turn on at once, or you can have them happen sequentially. So in that case, you would have one task show up, and once it was resolved, the next task would appear, and it would go through that entire list of tasks that you have. One last type of exceptions would be a policy exception. So you can go in for your institution, and you can define what types of policy exceptions you may want to track. You can then go in and you can turn on a policy at the customer level or at the loan level, and those are going to stand out with this little p icon. You can also pull specific reports for just your policy exceptions. All of these types of exceptions can be displayed on your dashboard page when you initially log into the system, and we have many reporting options that you can utilize to track this information. We have eleven standard exception reports that you can pull on demand anytime. These allow you to pull reports by assigned user, by customer if you wanna group customers together, by officer, and there's several other options that you have there as well. So if we were to go into the exception report by officer, we can choose which officers exceptions we're wanting to view, and there are several other filters that we can use to narrow down the exception information. So here's a look at what the exception report by officer would look like. We have our customer information, account information, and the specific exception information. If there's any comments that you've added to your exceptions, those comments will also show on this report. The report does include hyperlinks, so you can easily get to the customer's page by clicking on any of the hyperlinks that you see, and that would take you directly to that customer in AccuAccount. All of these reports can be set up on a subscription to be emailed out on a regular basis. So you may want to set up a subscription for your lenders that they get their own exceptions that are tracking in the system. This can also go to management. You can combine users on a specific report. You can combine by branch, really however you want to view that information, and then email that out as often as you would like. So here's a quick look at what that email would look like. We can see which report was generated. This is the exception report by officer for Mary Shelley, so she's getting all of her own exceptions. And it looks very similar to if you're pulling this report on demand. You still have the hyperlinks that take you directly to the customer. We have the customer's information, account information, and exception information. But it is nice because your lenders can receive this email, and then they can go in and start collecting this information right from this report if they don't want to get into AccuAccount because we do provide all the details that they need. We have an additional module in AccuAccount called dynamic reporting that allows you to build your own custom reports within the system. Within Dynamic Reporting, you can build as many custom reports as you'd like. This includes exception reports, you can pull data reports, You can pull document reports. Really anything that you want to report on, you can create this custom report. You can also import reports that have already been built and are saved on our support site if you're not wanting to start from scratch. But I wanna show you some of the features that you have if you're using dynamic reporting. So in here, I have an exception report by officer. Everything that you see in this report is completely customizable. When you're building the reports, you can choose the order of your columns. You can simply drag and drop these columns around for however you want to see that information. You can also choose how you are grouping this report. So in this case, we have grouped by officer. So I can see all of Alex Haley's exceptions grouped together on the report. You'd also be able to select which fields you want to have displaying on the report and which ones you want to filter by. These reports can be shared with other users, you can export the data, and you can email the report out. These custom reports can also be used to build data reports. For example, if we're viewing this deposits opened in the last ten day report. When building this report, I've been able to choose which columns I want to have displaying. I can put these columns in whatever order I'd like, choose how I'm grouping this report so we have the open date and then deposit types for all of the accounts that have been opened. A few other examples if you wanna pull reports on cross collateralized loans. If you're using applications, we can do pipeline reporting. Or you can even report on comments that are added to the system. Dynamic reporting allows you to pull any data from the system that you would like to see in a report. There are several other features that AccuAccount has available that we don't have time to get into today. But, of course, if you wanna see something more in detail, just let us know. The first one being AccuAccount. So this is a way that you can start an application within Accu account and be completely paperless. You define the permissions for who has access to your applications. You would define all of your workflows for each of your loan types to take it through an approval process. We have pipeline reporting for all of your applications. With AccuApproval, you can gather your credit documents, and it gives you somewhere to keep those images through the process. So we take your application through your custom approval process. It sends that application to each person or department that needs to review the loan through the approval process and keeps a total application history with your loan. We have flex fields, so we did kind of look at that in the demo. So you can have any of those additional fields that you would like to have displayed in AccuAccount either imported from your core or you can add that information manually into your flex fields. We have a built in quality control process for everything that gets done with your images in AccuAccount. So anytime there's changes to images, it's logged in our history and linked to a QC process. It logs who made the change, the date and time, what changes were made, if a document or even a single page is deleted out of a document, we will log that in the history. Notices can be set up and generated based on your exceptions. You can print off notice letters, or you can email them out of our system. With that feature, we do allow you to combine multiple exceptions onto one notice, And then we keep track of all those notices that are generated out of our system, and you can pull a report on those. We have an audit module, which is basically a mini AccuAccount that you can give to your auditors, but it only has the customers or accounts of loans that you choose to build into it. You don't have to give auditors access to your full AccuAccount system. You're only giving them the audit module that you build from AccuAccount. So once you select which customers and loans are going to be included in that audit build, that audit can be put onto an external device such as a jump drive or disk. It can be uploaded to an FTP site. If your auditors are on-site, you can also just give them the URL to that audit file. You can also use this feature to build a dataset if you're wanting to send items out to attorneys or if you're wanting to build a backup of denied accounts that you're wanting to purge from AccuAccount. So there's a few other ways that you can use the audit module as well. We also have a purge feature that is built into AccuAccount, so you can set up document retention rules to purge documents, loans, accounts, collaterals, or customers out of the system as needed. We have a participations module, which is a document sharing feature. This allows you to push documents to downstream participating banks or any outside contact. And documents can be emailed from the customer page manually as needed. For imaging anything that is not associated with a customer or an account, you can use our Accudoc system. We've built about thirty Accudoc modules that are built to house any back office documents. So accounts payable documents, human resources, we can build custom modules, really whatever you have in a paper file, we can create a module to scan those documents in. So I've seen modules for investments, credit card applications, insurance policies. It's really limitless as far as what you can scan for back office documents into our Accudoc system. So a little bit more about our services if you choose to go with AccuSystems and utilize our product. We install AccuAccount either on your server or on the cloud. So we will do a full implementation with you, which is typically nine to twelve weeks. Your administrators will work with an implementation specialist here at AccuSystems to completely customize your AccuAccount site. You will determine your bank's customer types, account and loan types, or collateral types. Then you'll choose the documents that you want to have required for each of those types, and which of those documents you want to track an exception on when they're missing or expired. You can have an unlimited number of users created in your system set up with specific permissions for what they have access to, and we'll work through the data we receive from your core to build the nightly import into AccuAccount. We have several methods of training that are available throughout your implementation process. We have video trainings that you can refer to at any time, and we will do a final live web based training with your users before you go live so they know how to do all of the editing functions within the system. All of our training is always available, so if you have turnover or if you have users that need a refresher on certain features, they have access to our training video library. Any live trainings that we have, your users are always welcome to join as well, and our trainings are always free. We also have a support team available for any additional needs or troubleshooting your software. We do not utilize a call center. We have our own support staff that you will work with to resolve any issues or work one on one with for any help that you need in the software. This concludes our AccuSystems presentation webinar. Feel free to reach out to us by phone or email for any additional information you'd like to receive. Thank you for joining, have a great day.
From loan application automation to drag-and-drop document imaging to document tracking and five-minute audit prep, AccuAccount is your document management solution for the entire life of the loan.