

[Playbook] Saving Commercial Lenders Time During Tax Season
Here's the situation: Accountants aren’t the only people who feel stressed during tax season. Commercial lenders and their assistants feel the pressure, too—especially when borrowers forget to submit their tax returns in a timely manner.
Collecting updated documentation from business customers and members is essential for managing risk, but lenders have other pressing matters to attend to (like making new loans). This playbook explores best practices for using AccuAccount to streamline the collection of borrowers’ tax returns.
Using Technology to Reduce Tax-Related Distractions for Lenders
Relying on spreadsheets and manual mail merges can be incredibly time-consuming, error- prone, and generally ineffective. As a result, commercial lenders must get involved to resolve tax-related exceptions, diverting their attention from higher impact responsibilities.
Using an ECM system that’s optimized for commercial lending allows back-office teams to oversee tax document collection—without requiring constant oversight from lenders. Let’s take a look at a few AccuAccount features that make this possible.
Here’s the Game Plan
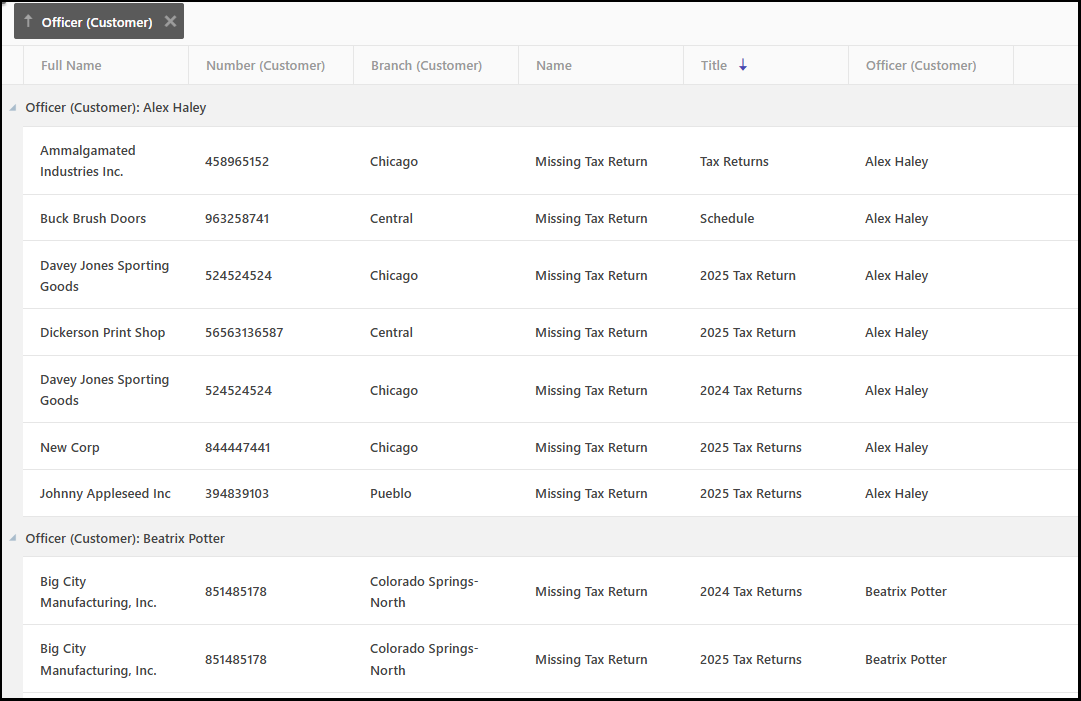
Configure Document Schedules: One of the biggest challenges involves knowing which borrowers actually owe you updated tax documentation. The document scheduler feature in AccuAccount simplifies the tracking of recurring documents like annual tax returns. Configuring a global schedule for tax returns automatically creates new document placeholders and triggers exceptions for past due items.
Thank you for joining today's training session. Today, we'll be looking at the document scheduler functions in the system. The document scheduler is a feature that can be used with an Accu account to build schedules either globally or on a customer's page, making it a custom schedule. When the Document Scheduler runs, it will create a new sub document for the document tab that it's tied to. Some of the benefits of using the document scheduler would be that your recurring documents are automatically created, so you won't have to remember to collect a customer's documents on a regular basis. There is an automatic exception tracking for the new document tabs that are created as well. So if you have that missing document exception built for that tab, it's going to start tracking right away when the document schedule builds that empty tab for you. The exceptions that begin tracking for the new documents that are created with your scheduler can work in conjunction with your exception filters and grace periods. So this means that the document tab will be created as a placeholder to be able to scan or upload an image into, but it won't track an exception if the loan balance is below a specified amount or if the account is within a specific status, you can use those exception filters. It would also allow a new exception to show as pending if there is a grace period associated with that document's exception. And the document schedule will automatically set the expiration date on a newly created document if that document tab is set up to expire. So this process can pre fill in that expiration date for you, but it's still just the expiration date. It's not a, due date or a grace period for the document itself. Our training video for the document scheduler goes through all of the ins and outs for setting up the schedules, editing existing schedules, and the document status rules, as well as the nightly process that runs to create the new document tabs. So we're gonna jump into AccuAccount now and take a look at this feature. Now I'm currently signed in as an administrator because we're gonna take a look at the global schedules first, and you do need to be an administrator to set up a document schedule globally. For this, we're going to start on our admin page, and we're going to come into required document maintenance. This is where you can modify a document structure for a customer or account type. For today's training, we're going to work on my entity customer type. So from here, I am seeing all of the document tabs and groups that have been associated to my entity customer type. For this example, we're going to work with my business tax return document tab. We can see that right here near the bottom. To set up the schedule, I'm going to click on the pencil to modify this document tab. And here at the bottom, we're going to see the option to manage document schedule. Our first step is to check the box to enable document scheduling. This is going to give us access to the document scheduler settings. Our first setting is when it needs to start creating those new empty document tabs. For our training today, we're just going to use today's date, but you'd be able to enter in any date depending on when you wanted the scheduler to start running for you. The next step is to set the frequency. How often do these empty tabs need to reoccur? The first box here, is a text box that will allow you to enter a number, and it is paired with a drop down to select days, months, quarters, or years. It does default to one, and the first option in the list is days. So when you're setting up your document scheduler, especially globally, globally, you'll want to be sure to double triple check this field and make sure that your frequency is correct. Any tabs that are created through the document scheduler, once they're on the customer page are treated like any other tabs. There's no undo button or a way to mass edit document tabs created through the scheduler process. So if the schedule were to get set on every one day, it can quickly create a lot of extra tabs that you may not need on those customer pages, and they would have to be deleted manually from those customer pages. For our example today, I'm going to set this up as an annual tab since we're looking at a tax return. So I'm going to set this up for every one year. The next field is a schedule end date. So this is an optional field. If you know in advance how long you want this schedule to run, you can enter a date in here, and the schedule automatically turn itself off on that date. If you're not sure what that end date should be or if you just want it to run until you say stop, you can just leave this field blank. The next field here is for the document expiration period. Now this setting here will always show up in the document scheduler settings, so this section here always looks the same. If this is a document that can track an expiration date, this can be used to automatically fill in that expiration date for you. We will take a look at an example of that. For this tab, it is not set up to track an expiration date. The box for can expire is unchecked. So for this, we can just ignore these settings, and this document expiration period isn't going to do anything for this document tab. The next section here is the document title. This is how you want those empty tabs to appear on the customer page as they're being created so they stand out and you can tell those empty tabs apart. By default, it's going to have the tab name, create month, and create year. So this would say business tax return May of twenty twenty three. Now this can be modified to suit your needs. You can remove all of these fields and using these options here at the right, they can be added back in. And if you're using these fields, be sure to add those spaces in between for proper punctuation or those values will be run together on the customer's page. You can also choose to add additional text. So if I were to add the word updated, for example, the word updated would then appear on every document title that this schedule creates. So this case would say updated and the create year, so this would be updated twenty twenty three. We may say something like tax year twenty twenty three. So there's a lot of ways that you can customize the way these document titles should appear on that customer page. Once you've filled in these settings, we're gonna go ahead and click on update. Back here now in required document maintenance, we're gonna be able to now go to the customer's page. So we finished our settings here. So we're gonna take a look at a customer's page now to see what the schedule looks like. So I'm gonna begin by pulling that page up. So we're gonna come here to the midnight duck. And we can see now for my business tax return tab that I have this calendar icon showing here on the right. And when I hover over that, it gives me the option to manage the document schedule. And if I click on this calendar, I'm gonna see those schedule settings. So these were gonna match those global settings that we just set up in required document maintenance. Now the document scheduler itself is part of the nightly process. So even though we've created this schedule and we've said that we wanted it to create empty tabs starting today, that will not happen until we run the nightly process. So I'm going to simulate that by running just the document scheduler piece, you wouldn't have to do this manually. This is what happens on your server at night. And when we refresh our customer page here, we now have our new empty tab. So we have our existing document that was here before. We now have a new empty tab that is titled just the way we set it up tax year, and then the current year, which is twenty twenty three. If we were to come into the manage document schedule now, we can see that our create document on date has now been advanced. So this schedule is now set up to create a new tab next May, so we can see exactly how often it's going to be creating those tabs and when the next one is scheduled to be created. So that is how you can set up a schedule for a global document, which means all of my entity customers are going to have the same schedule for this business tax return. So if we looked at another entity in my system, we're gonna see that same empty tab as it's going to affect all of them equally. Now you can also set up a custom schedule right here on customer's page, and a custom schedule only exists and runs where it is built. For this example, we're gonna take a look at my financial statement tab, which you can see, in this case, doesn't have any existing image. So this one is completely empty right now. To set up a custom schedule here from the customer's page, we're gonna go into the tab edit on the left, and we're gonna select the option to manage schedule. On here, we're gonna see the same settings that we saw globally. Our first step, because we're here on the customer page, is to select that we're going to override the default schedule. So this tells the system that if there are any global settings, we're going to ignore the global settings, and we're gonna use this schedule instead. The next option is to then enable the document scheduler to turn it on for this customer page, and checking that box is going to now give you access to those same document scheduler settings we saw globally. For our first step, we're gonna select when we want this document scheduler to begin creating tabs. In this case, I'm also gonna show you how the document scheduler can be backdated to create extra tabs for you. So if I wanted to use this, say, as a quarterly financial statement, and I wanna get this every quarter, let's say I wanted to start that at the beginning of the year, and we'll go ahead and put in I hit my number lock key. Sorry about that. We'll put in January first as our create document on date. So starting at the beginning of the year, and then for our frequency, I'm gonna say that I wanna do this quarterly. I could also say that I wanna do it every ninety days, every three months. So there's a lot of flexibility in how you set up this schedule. Again, be sure that you are double checking this frequency and that it is correct and that it doesn't get left on every one day because that can very quickly, especially when backdating, create a lot of extra tabs, and those extra tabs will have to be deleted manually on the customer's page. There's no undo button for the document scheduler. So we'll go ahead and just say we're setting this one up quarterly for this example. I'm gonna leave the schedule end date blank for this example, but we are gonna take a look at the document expiration period. So my financial statement is a document that can track an expiration date. So I can use this field here to pre populate what that expiration date can be. And for this example, I'm gonna just set it out for thirty days. So when these documents are created, the expiration date will be populated thirty days from the create date. For our document title, let's just go ahead and call this the tab name and the month. So this would be financial statement January, for example. And then I'm gonna lock the settings. This just tells the system that I'm done modifying the schedule, and then click on update. So we now have our same manage document schedule icon on the customer's page for the financial statement. I can click on this to come back in and view those settings. So what I'm going to do now is rerun that process. So we're gonna run that document scheduler process just like we did before. And when I refresh the page, we can see that we have multiple tabs made because I backdated this schedule to January, we have a January tab. And if we look at our create date, this is January first. So that was that very first create date on that we entered into the schedule. And we can see that the expiration date has been prefilled in for thirty days out. So I can fill in this expiration date for you, but again, it's not it's not a due date. It's not a grace period. It's just a way of setting this date up for you as part of the schedule. And then we have a second tab that was created for April. So if we look at this one here, it was created, the document date for April first with an expiration date that was thirty days later. And if we come in here now and look at our document schedule settings, we can see our next create document on date has been advanced to July first. So I've backdated it to get those quarterly statements I'll need for this year. It's created the tabs I would need as of today, and now it's going to continue on quarterly creating those tabs as needed. Now you can also modify a document scheduler from the customer page as well. From this window here, we're reviewing the settings, I can unlock the schedule settings, and this is gonna give me access to those settings once again. So if I needed to change going day forward, so these changes would not be applied to tabs that have already been created with the document scheduler. But if I wanted to instead make that expiration date sixty days or change the way that my titles are being set up, I can make those changes here. And then with this one, our next create date is in July. It's going to use those updated settings. To show you what that may look like, let's go ahead and just set this back to today. So we'll set this up for May second. So now we have a new schedule. And if I run that process one more time, So it just takes a moment here. Now we have another new tab. So this tab is based completely on the new schedule. So we have the new title, the way we set it up, updated, and the create month. If we look at our document tab here, our document date was that new create document on that we entered of today's date, and it pushed out that expiration date by ninety days instead of just thirty days. So you are able to modify that schedule, and it's going to affect any new tabs going day forward, but it will not any impact any tabs that have already been created. So I did get a question that came in. It says, why did you lock the custom scheduler versus the global scheduler? Is it because you want the custom one to override what is at the global level, or are the global ones not supposed to be locked as well so users cannot turn it off? That is an excellent question. We really only need to use the lock schedule settings when we're making changes on the customer page. So you have the right of it. It's to tell the system we wanna use these settings and not allow the global schedule to overwrite those settings. So you're absolutely correct about that. Because if we were to come back in here and look at that schedule for the business tax return, it's gonna show those schedule settings as unlocked because they have been set up at the global level. In this case, we can override the default schedule to make changes, and then we would be able to lock those changes in if necessary. I did get another question that came in. Are you able to merge the tabs together later on, say, all of the twenty twenty three to keep the file clean? Absolutely. The document scheduler is going to create these empty tabs for you so that you don't have to worry about coming back to the customer page manually and creating those empty tabs to get them showing on your exception report. So they're automatically going to begin tracking that missing document exception if one has been billed. So that's gonna be your reminder that there is a new document that is due. Once the documents are in the system, however, you will have the same access to merge them that you would any other document tab. So if we were to let me get some test documents here. If I brought in some financial statements, I can bring these in here on the customer's page. And I would still be able to come into the tab edit here on the left, select merge files, and merge those altogether. So I might select this May statement as the most recent one in the batch to be on top. Select the other ones, and I can then merge those down into a single document tabs. You would absolutely have access to that feature once those tabs are in the system. Some really fantastic questions today. Now, one of the other things you can do when modifying the document schedule is you can turn the schedule off. So if we've got what we needed out of this particular document schedule, I can unlock the settings and then uncheck the box to enable the document scheduler. This in and of this in itself is enough to turn off the document schedule for this customer's page. I can also choose to uncheck the box to override the default schedule, meaning that if there are global settings, they would once again be able to take over the schedule for this tab. Or if there's no schedule no global settings now, but maybe there's global settings later, it leaves that door open to go back to using whatever is set up globally in the system. So once I update, you'll see that my document schedule setting is now gone from the customer's page, but any document tabs that were created while the schedule was one running will remain behind, so they will not be affected. So that is another way that you can modify, that schedule from the customer's page to turn it off. If you were done with a global schedule, that would be done the same way that you did when it was set up. So we would go back into our required document maintenance, back down to our business tax returns. And if we were done with this schedule and created what we needed, we could simply uncheck the box to enable the document scheduling and click on update. So if we come back to the customer's page now, we still have that empty tab that was created by the document scheduler, but you'll see that that calendar icon on the tab has been removed because there is no longer a schedule attached to this document type. So the last piece that I wanted to mention today before we wrap up is some of the status rules when it comes to using the document scheduler. When you're setting up the document scheduler on the customer's page, the scheduler will only run and create new tabs for documents that have been set as required by default. So if you try to set up a document schedule on a tab that is set to NA by default, you're not gonna see those new tabs being created. If you're having any questions about this process, you can always reach out to support. We'd be happy to take a look at that with you. But that is the default setting for those document tabs. I did get another question that came in. Are you able to remove the expiration dates if you received a recent financial statement but were not going to get the previous months to keep your exception report correct. Absolutely. Once those document tabs are on the customer page, they will function just like any other document tab, that you created manually or through any other method. So you'd be able to come in here, remove that expiration date. I can manually change the document date. I can say that this is the May statement, so you can make any changes as necessary to those document tabs. The document scheduler just takes that ease of remembering to do it manually out of the equation by putting those on a schedule so they're showing up on your reports automatically for you.
Exception Reports & Subscriptions: AccuAccount offers standard exception reports, which efficiently surface documentation gaps during tax season (and throughout the rest of the year). Back-office staff, lenders, loan assistants, and other interested stakeholders can subscribe to receive exception data in their inbox. In addition, Dynamic Reporting for AccuAccount allows users to quickly build custom reports for a more detailed look.
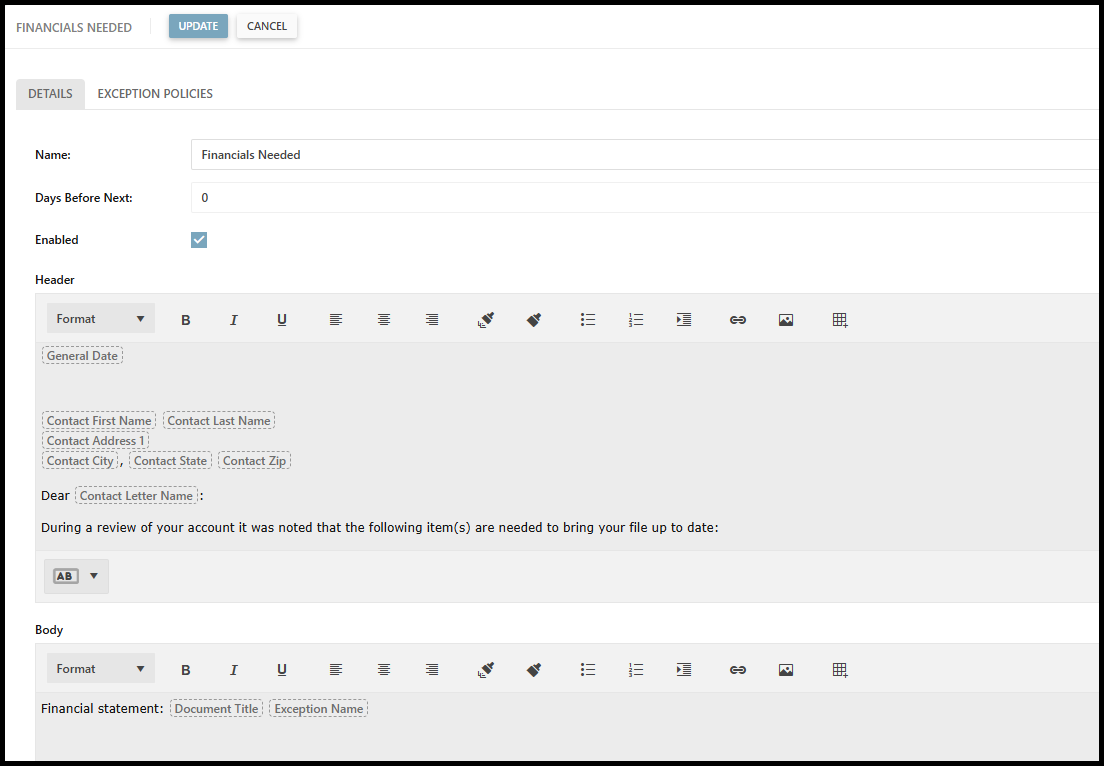
Notice Letters & Emails: Stop exporting contact lists and merging them with tickler data. Instead, manage your notices within AccuAccount. Our software provides an intuitive “point and click” experience for preparing paper and email notices. And, with staged notices, you can create a multi-step sequence to remind borrowers about tax documentation. As soon as missing documents are scanned into the correct location, AccuAccount clears the exception and prevents the borrower from receiving further notices.
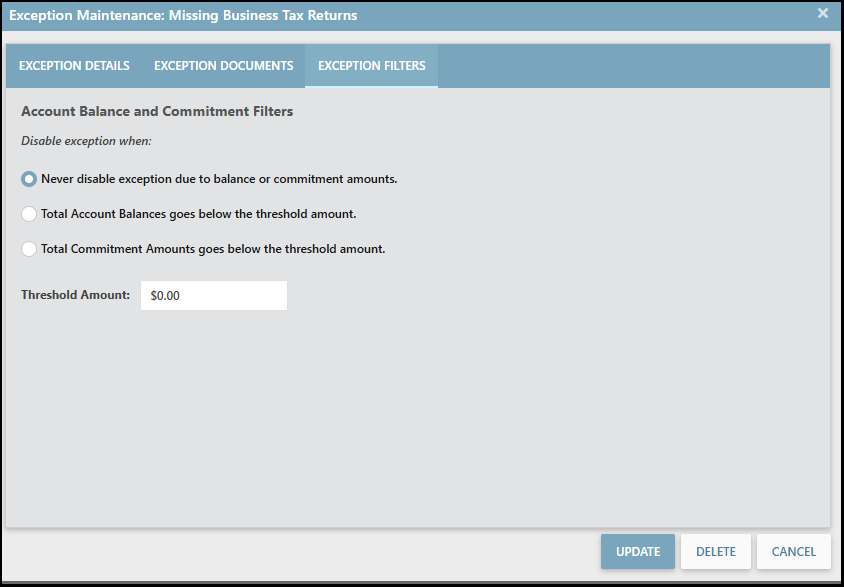
Thresholds: Last, but not least, AccuAccount supports “thresholds”—a handy feature that disables exceptions when commitment amounts or account balances fall below a specified amount. Using thresholds prevents unnecessary friction with borrowers while ensuring compliance with your loan policy.
Give Lenders Some Breathing Room During Tax Season
Do your lenders spend too much time on administrative outreach during tax season? Learn more about AccuAccount, Alogent’s ECM software that’s designed for the unique requirements of commercial lending.
Contact us to request pricing and a demo!
Be the first to know! Click below to follow us on LinkedIn for news and content updates!