
[Playbook] Using a Virtual Printer to “File>Print...” Documents from Your Backlog
Here’s the Situation: You’ve been asked to lead the migration from your bank’s current document management system to AccuAccount. Your bank has a large backlog of electronic files in various formats—PDFs, spreadsheets, memos, TIFFs, etc—across multiple banking apps, network driver folders, and user devices. You’re only one person, so going from branch to branch to oversee every step of the process isn’t feasible. This article explains how to use a “virtual printer” to get documents into AccuAccount.
What is a Virtual Printer?
The phrase “virtual printer” can sound a little intimidating, but it’s a pretty simple concept. Think of it this way. Imagine that your boss sent you an important checklist that you’d like to print with your desktop printer. How would you do that? After opening the document, you might go into the menu and click “File>Print…” Doing so opens the print menu screen, which allows you to specify your preferred printer, number of copies, pages to print, and other important details. A “virtual printer” piggybacks on this same concept, allowing you to specify a software application—in this case, AccuPrint—to electronically “print” your document instead of printing a hardcopy with paper and ink. Using AccuPrint to “print” your documents into AccuAccount has numerous benefits, including:
- Anyone at your bank can install and use AccuPrint—no extra licenses are required
- Documents are uploaded to a temporary folder for your back-office team to review, edit, and QC prior to landing them into AccuAccount
- You can easily remove passwords from password-protected files
Play #1: Use “File>Print…” to Move Documents to the Customer’s Electronic File
Let’s assume that you want to become an expert at using virtual printers before training others at your bank. Smart move! Get started with these steps.
Here’s the Game Plan
Step 1: Open any customer or account-related document or spreadsheet. For purposes of illustration, let’s assume you’re working on a correspondence document for John Smith.
Step 2: Click “File>Print…” from the document’s menu bar. You’ll see a print screen that looks like this:
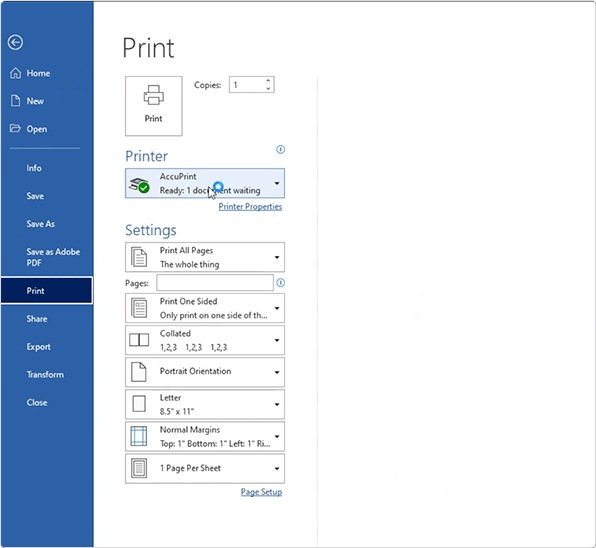
Step 3: Select “AccuPrint” as the printer. Specify which pages you wish to virtually print along with any other preferences.
Step 4: Press “Print” to launch the AccuPrint screen. Here you’ll be able to add the customer and account, document tab, document title, and comments.
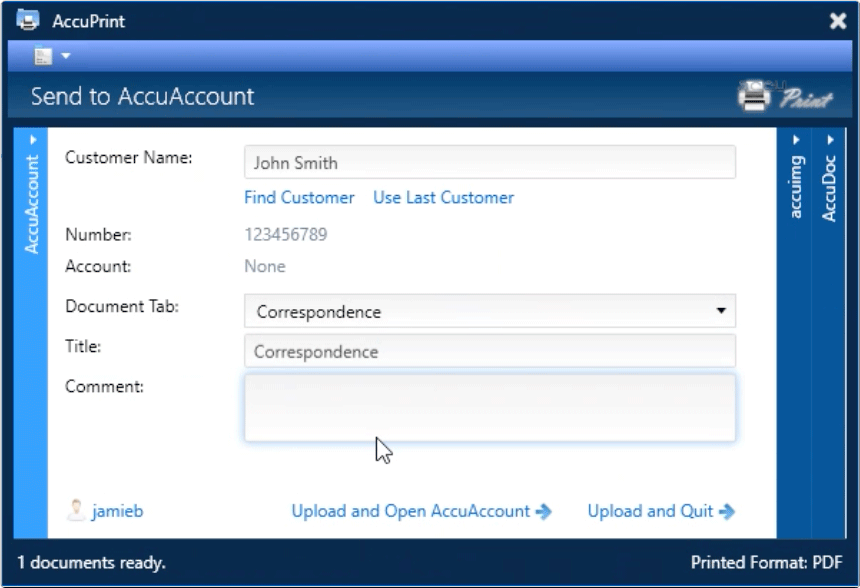
Step 5: Click the upload link to save the document into AccuAccount.
Pro Tip: Need to virtually print numerous documents for the same customer? Click “use last customer” instead of manually searching. Every second saved adds up!
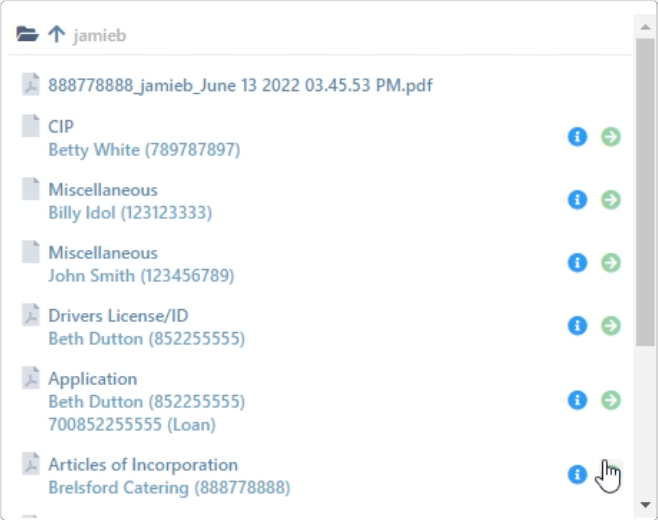
Step 6: Documents virtually printed with AccuPrint are saved into the “my uploads” folder in AccuAccount. Here you can do a final QC check before saving documents to their final destinations in AccuAccount.
Play #2: Show Others How to Use the Virtual Printer
Remember, AccuPrint comes with an unlimited license, which means everyone at your bank can use it. And, one of the nice things about AccuPrint is that users can virtually print documents into your uploads folder. Lenders, loan assistants, deposit users, and other teams can be virtually printing documents from any branch into your queue. Simply click to review, edit, and QC their work prior to sending the documents to their final destinations. Note: Users would follow the same steps outlined in the previous play. The only difference is that step six would be performed by you or your QC team.
Who Knew “Printing” Could Be So Much Fun?
Using a virtual printer like AccuPrint can help your bank work through an electronic backlog in less time—and with less tedious work by you. Learn more about AccuPrint and our imaging solutions.
Be the first to know! Click below to follow us on LinkedIn for news and content updates!